
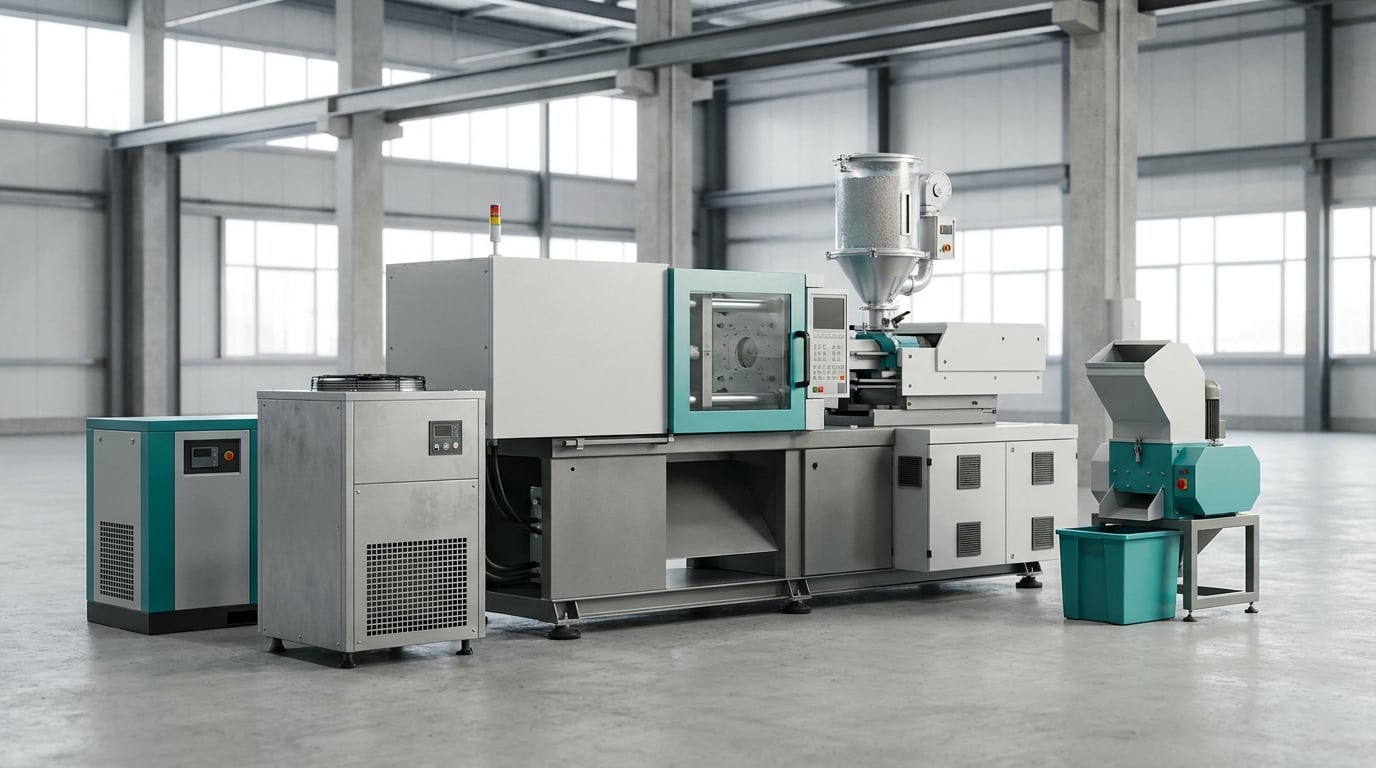
A molding shop runs on far more than the press. Auxiliary equipment is everything around the injection molding machine that dries and moves resin, controls mold and coolant temperature, handles parts and recovers scrap, and the auxiliary equipment every molding shop needs stays the same across machine size: a dryer that holds the material dry, a controlled feed, mold temperature control, cooling, scrap handling, and safe material movement around the cell.
The press itself only melts and forms plastic. It cannot dry pellets, hold a mold at temperature, or get a part into a box. Every quality problem a shop blames on the press usually traces back to something feeding it or cooling it, which is why auxiliary equipment every molding shop needs is best treated as a checklist rather than an upgrade list.
Below is the twelve-category list I would walk a plant manager through, plus how to size each piece, what it costs you when it fails, and the order to buy in when capital is tight. Reference numbers here are typical industrial ranges, not specifications; confirm them on your own resin, mold and cycle before committing to equipment.
Table of Contents
- Auxiliary Equipment Every Molding Shop Needs at a Glance
- 1. Industrial Temperature Controllers and Monitoring Systems
- 2. Industrial Air Compressors and Dryers
- 3. Chillers, Cooling Towers, and Process Water Systems
- 4. Material Drying, Conveying, and Gravimetric Feeding Systems
- 5. Industrial Vacuum Systems and Hopper Conveying
- 6. Robotic Part Removal, Palletizing, and End-of-Line Automation
- 7. In-Mold Sensors, Process Data Systems, and Condition Monitoring
- 8. Dimensional Inspection and Quality-Control Equipment
- 9. Mold Maintenance, Repair, and Cleaning Equipment
- 10. Industrial Material Handling Equipment
- 11. Safety, Environmental, and Compliance Equipment
- 12. Preventive Maintenance and Plant-Floor Support Systems
- How to Choose Auxiliary Equipment for a Molding Shop
- Frequently Asked Questions
- What is auxiliary equipment in an injection molding shop?
- Which auxiliary equipment should a small molding shop buy first?
- Are temperature controllers and chillers basic or advanced molding equipment?
- How much does auxiliary equipment improve injection molding productivity?
- Should a molding shop automate parts removal and palletizing?
- How often should molding shop support equipment be maintained?
- Conclusion
Auxiliary Equipment Every Molding Shop Needs at a Glance
The table below lists each category, the job it does, the conditions that make it urgent, and whether it is a basic, growth or advanced investment. A one-press job shop can run lean, but every row still applies somewhere in the cell.
| Category | Primary job | Most urgent when | Investment level |
|---|---|---|---|
| Temperature controllers and monitoring | Holds mold, oil and melt temperature at setpoint | Dimensional drift, warpage or slow cycles on tight-tolerance parts | Basic |
| Compressed air and air treatment | Pneumatic ejectors, clamps, safety circuits, granulator drives | Any cell with pneumatic take-out, ejectors or pneumatic safety | Basic |
| Process chillers and water systems | Removes mold and hydraulic heat, keeps coolant at setpoint | Cycle time will not close, or coolant runs warm in summer | Basic |
| Drying, conveying and gravimetric feeding | Keeps resin dry, blends additives and regrind, doses accurately | Any hygroscopic resin: nylon, PC, PET, PBT, PMMA, PETG | Basic for dryers, growth for dosing |
| Vacuum systems and hopper conveying | Moves pellets from the silo or bag to the machine hopper | Four or more machines, or manual bag handling becoming an injury risk | Growth |
| Robotic take-out and end-of-line automation | Removes parts and runners, boxes and stacks output | Cycle under 30 seconds, high cavity count, or no second operator available | Advanced |
| In-mold sensors and process data systems | Measures cavity pressure, temperature and cycle, stores the data | Scrap is unexplained, or customers require traceability records | Growth |
| Dimensional inspection and quality control | Confirms the part matches drawing and holds capability | Customer-approved parts, regulated markets, or new part startup | Basic to advanced |
| Mold maintenance, repair and cleaning | Cleans, lifts, stores and repairs tooling without damage | Any shop with more than a handful of active molds | Basic |
| Material handling | Moves resin, parts, tooling and scrap safely by forklift and conveyor | Anything heavier than one person should lift | Basic |
| Safety and environmental equipment | Guarding, interlocks, extraction, spill and dust control | Immediately, before any new machine is energized | Basic, non-negotiable |
| Preventive maintenance support systems | Lubrication, filtration, calibration, spares, CMMS records | Before adding a third or fourth machine to the building | Growth |
1. Industrial Temperature Controllers and Monitoring Systems
Temperature control is the auxiliary that decides whether a part repeats. Mold temperature controllers (TCUs, often called thermulators) circulate water or oil through the mold’s cooling and heating channels and hold the setpoint, typically to within plus or minus 1 degree C on a good unit.
Three details matter more than the headline capacity. First, control zone count: a single-zone unit handles a simple two-plate mold, while a family tool with a hot runner or multiple cavities at different temperatures needs dual or multi-zone control. Second, sensor placement: a thermocouple in the return line tells you what the mold is actually seeing, not just what the heater is delivering. Third, alarms. An over-temperature or low-flow alarm on the TCU stops a run before it bakes the tool.
Melt temperature needs its own instrumentation. Barrel zones on the press have heaters and thermocouples, but a barrel thermocouple measures the heater, not the melt. A melt thermocouple in the nozzle or a melt temperature probe in the barrel gives the real number, and that number is the one you record in your setup sheet.
Add data logging and you get something worth having: temperature history tied to shot count lets you see a controller drifting slowly, which is a far cheaper problem to find than a batch of out-of-tolerance parts. For press and TCU data to be comparable, the two need a common clock, which is what the process data systems in section 7 handle.
2. Industrial Air Compressors and Dryers
Compressed air runs more of a molding cell than most buyers expect. Pneumatic ejectors, slide and gate actuation, robot pneumatics, granulator drives, some press safety circuits and most packaging equipment all draw from the same header.
Size the system on peak simultaneous demand, not average draw. A receiver sized to the peak demand gives the compressor time to recover instead of the cell pressure sagging every time the ejectors fire; a common approach is to size the receiver so it can supply the measured peak flow for roughly 30 to 60 seconds while the compressor catches up. A compressor cycling constantly on and off is the sign this was skipped.
Moisture control is the other half. General molding air typically wants a pressure dew point in the region of 4 degrees C (40 degrees F) or lower, and hygroscopic material handling wants it much colder, around minus 40 degrees C (minus 40 degrees F) and colder for the most sensitive applications. Compressed air coolers and aftercoolers knock out bulk water, but a refrigerant dryer or desiccant dryer is what actually holds dew point.
Finish with filtration. A particulate filter in the 5 to 25 micron range handles general dirt, a coalescing filter removes oil aerosol, and a final filter in the sub-micron range protects seals and precision pneumatic components such as metering valves. Filter elements are consumables, so put them on the preventive maintenance schedule in section 12 rather than waiting for a pressure drop.
Leak hunting pays here more than almost anywhere else. A shop that cannot put its hand on a leak after shutdown will keep paying compressor energy for years.
3. Chillers, Cooling Towers, and Process Water Systems
The chiller is where most shops under-invest first and regret later. It has to remove the heat the mold cannot hold, and on a fast cycle the cooling stage is usually the longest part of the cycle, so a chiller that is small or badly maintained shows up directly as lost cycle time.
Sizing starts with the heat load, not the clamp tonnage. Every kilogram of polymer brought to melt temperature has to lose that heat somewhere, and a fraction of the machine’s connected electrical load ends up as heat in the cooling water. Many shops find their real demand between a fifth and a third of the press power rating once hydraulic and motor losses are included, but the only reliable number comes from measuring the actual water temperature rise and flow on a running machine. One ton of refrigeration equals 3.517 kW of heat removal; quote capacity in kW and the conversion is simple.
Setpoint matters as much as capacity. Chilled water at 7 to 12 degrees C is the common working range for mold cooling; running colder increases the approach to dew point and brings condensation into the circuit, which is a corrosion and biofilm problem you do not want.
Keep the circuits separate. Process water for mold cooling, hydraulic oil cooling and any compressed air or chiller condenser loop should be distinct loops with their own pumps, filters and air separators. Sharing a loop means a mold leak, a corrosion product or a dosing mistake contaminates everything on it, and you lose the ability to add corrosion inhibitor or biocide to the mold loop without affecting the machine.
Towers versus closed loops is a site decision. Open cooling towers need water treatment, blowdown and more attention to water chemistry, but they reject heat cheaply. Closed-loop systems need less water and less treatment, and they need air separators and expansion vessels to control the moving air that eats pump seals. Whichever you run, install a strainer at the machine inlet and a differential pressure gauge across it so a blockage is a reading, not a discovery.
4. Material Drying, Conveying, and Gravimetric Feeding Systems
Moisture is the most common cause of scrap in molding, and it is invisible until parts fail. Hygroscopic resins pull water out of the air through the hopper wall continuously, so a hopper that sits over a weekend can load the barrel with wet pellets by Monday morning. A dehumidifying dryer circulates air through a desiccant bed and a separate process heater, holding a low dew point over the material, which is why it beats a simple hot-air hopper dryer on nylon, polycarbonate, PET and PBT.
| Resin family | Typical drying temperature | Typical residence time | Target dew point |
|---|---|---|---|
| PA6, PA66 (nylon) | 75 to 85 degrees C | 2 to 4 hours | minus 40 degrees C or lower |
| PC (polycarbonate) | 110 to 125 degrees C | 2 to 4 hours | minus 40 degrees C or lower |
| PET, PBT, PETG | 110 to 125 degrees C | 2 to 4 hours | minus 40 degrees C or lower |
| ABS, SAN, PS | 75 to 90 degrees C | 2 to 4 hours | minus 30 to minus 40 degrees C |
| PMMA | 75 to 85 degrees C | 2 to 4 hours | minus 30 to minus 40 degrees C |
Treat that table as a starting point and confirm against the resin supplier’s technical data sheet, because moisture limits and drying windows differ by grade. Verify the result rather than trusting the display: Karl Fischer titration on a sample taken at the hopper throat is the only direct measurement, and it is worth doing when you first qualify a material.
Feeding has three jobs that are easy to conflate. Conveying moves pellets. Dosing controls how much enters the barrel. Blending mixes in the things that make a part work: color masterbatch, glass or mineral fiber, additive packages and controlled regrind ratios. A gravimetric blender weighs each component and holds the recipe to a fraction of a percent, so a color or a regrind ratio is repeatable. A volumetric doser is cheaper and faster to change but its accuracy drifts with material density, which matters when the recipe includes regrind of a different bulk density.
Hopper and level details decide whether the system is reliable. A stainless steel hopper with a slide gate and a proper low-level sensor that alarms before the throat empties is worth far more than a bigger dryer. Specify quick-connect couplings on feed lines so a machine can be swapped without tools, and specify material shortage alarms wired to the press so a starvation event stops the cycle instead of producing a string of short shots.
5. Industrial Vacuum Systems and Hopper Conveying
Bag-to-hopper is fine for one machine. It is not fine for ten, and it is where a lot of shop injuries come from, because climbing on a ladder to lift a 25 kg bag onto a hopper is a routine shortcut people take without thinking.
Vacuum conveying removes that task. A central system runs one vacuum pump and a filter bank that feeds multiple machine hoppers through a distribution pipework, with individual level sensors stopping each receiver when it is full. Small pneumatic pick-up loaders do the same job for a single machine, mounted on a lift column so the hopper is raised to a fill position rather than climbed. Either approach gives the same three results: no manual lifting, no dust at the hopper, and consistent fill level, which feeds into predictable shot weight.
Vacuum systems have their own maintenance personality. Filters clog, and a clogged filter shows up as slow conveying and an overloaded pump motor rather than as a filter warning, so put filter differential pressure on the routine. A receiver sized to a sensible fill cycle reduces how often the pump cycles, and a correctly placed airlock or rotary valve keeps conveying air from migrating into the dryer hopper and spoiling the dew point you are paying for.
Dust collection on the hopper inlet is worth adding on any conveying system, because fine pellets and regrind dust at the fill point are both a housekeeping problem and an inhalation exposure. Filter the exhaust back to the dryer exhaust where the equipment allows it, which cuts both the dust problem and the heat load on the dryer.
6. Robotic Part Removal, Palletizing, and End-of-Line Automation
Robots remove the part from the mold, place it on a conveyor or into a box, and pull the runner out, all inside the mold open window. The economic test is simple: total pick-and-place time has to fit inside the open mold time with margin, and a rule of thumb used in most cells is to target a robot cycle around 60 percent of the press cycle so the robot is never the constraint.
Size the robot by payload, not by reach marketing. Payload has to cover the part, the runner and the gripper together, with a safety factor on top, and reach has to cover the mold area plus the drop position. A three-axis Cartesian picker suits a single cavity, a low-shot part and a simple drop; a six-axis articulated arm is what you need for tray-in-tray-out, multi-cavity or injection-molded-in-place work.
End-of-arm tooling (EOAT) is where most cell problems originate. Vacuum cups fail on textured, dusty or warm parts, and a vented cup with a check valve is a cheap fix; grippers are better for heavy or fragile parts, and they need the part geometry designed around them. Specify a quick-change coupling for the EOAT and vacuum supply so a changeover does not need a technician, and keep spare cups and seals on the shelf, not in a supplier’s lead time.
Downstream, conveyors and palletizers move the boxes. Here is where I would draw the line: pick-and-place usually pays back on a stable, high-volume part, while end-of-line palletizing pays back when labor is genuinely scarce or the part is heavy and repetitive. For a shop with frequent changeover, low volume or a mix of one-off prototypes, a good operator and a simple roller conveyor will often outperform a robot that spends its time waiting for the next job.
Safety is not optional with any robot cell. Guarded fencing or a light curtain, a safe-rated presence sensing device, an emergency stop within reach and lockout provisions for the maintenance position are all expected, and the guarding has to be designed around the parts that actually come out, not around a layout drawing.
7. In-Mold Sensors, Process Data Systems, and Condition Monitoring
A press reports what its platen did. Cavity pressure sensors report what the plastic did, and that is the measurement that explains a flash, a short shot or a sink mark. Installing cavity pressure and a mold temperature sensor per cavity on a critical tool turns troubleshooting from guesswork into a pressure trace you can read against the part.
The next step is getting that data off the machine. Standard machine interfaces such as Euromap and OPC UA, plus a data gateway or historian, let you pull shot counts, cycle time, cavity pressure, barrel zone temperatures and alarm history into one place. Once the data is together, the useful analysis is simple: plot cavity pressure against part weight, and a flash, a short or a gradual nozzle wear shows up as a drift long before the scrap bin tells you.
Condition monitoring extends the same idea to the auxiliaries. Compressor run hours and load, chiller compressor current and leaving water temperature, dryer filter differential pressure, granulator motor current, robot axis homing faults: each of these becomes a trend line that flags a developing fault. Vacuum leak on an ejector, a failing dryer blower bearing and a chiller approaching its fouling point all show up as a slow trend well before they show up as a stoppage.
Availability and performance tracking on the presses is useful too, because an OEE number that falls tells you whether to go after downtime, small stops or rate loss before deciding on new equipment. Track the auxiliaries in the same system, since a machine that is idle waiting for a chiller or a dryer has an availability problem that no press purchase will fix.
8. Dimensional Inspection and Quality-Control Equipment
Inspection equipment has a clear order of escalation. Start with the basics: a good digital caliper checked against a gauge block, an outside micrometer, bore gauges and depth gauges, and thread gauges where the drawing calls for them. These cover the majority of in-process checks and cost very little, and a caliper that has been dropped and reads 0.05 mm off is worse than no caliper at all.
Then add attribute inspection for the features a caliper cannot judge: optical comparators and vision systems for profiles, flash and gate vestige, blue light for fine burrs and stress marks, and a simple go/no-go fixture where a feature is pass or fail and measured every time.
For new part startup and supplier qualification, a coordinate measuring machine or a dedicated scanning arm answers questions the handheld tools cannot, particularly on datum-heavy or compound-angled parts. Run a gauge repeatability and reproducibility study before trusting any new measurement, and keep the study with the equipment file.
Software is the part that compounds. Statistical process control on a handful of critical dimensions catches drift before parts go out, and a first-article report with actual measurements against drawing tolerances is what a customer auditor wants to see. The same system that holds inspection data usually holds the process data from section 7, and joining them is what makes a real capability study possible.
9. Mold Maintenance, Repair, and Cleaning Equipment
Tooling is usually the most expensive asset in a molding shop after the building, and it is the one most often damaged by improvised handling. The equipment list here is mostly about not hurting it.
Lifting comes first. A jib crane or an overhead hoist sized to the heaviest mold, lifting eyes and a lifting beam rated for it, and a proper set of chains and slings is the difference between a scheduled lift and a forklift driver improvising one. Never move a mold on its runner plates or ejector pins.
Mold carts with proper casters, sized to the mold footprint and weight, let a tool be moved to the press and back without a forklift. Storage needs adjustable racks or shelving that hold the mold base flat, plus a designated clean area. Molds stacked on the floor pick up floor contamination, and contamination on the parting line is the fastest route to flash and parting-line wear.
Cleaning and maintenance equipment is mostly consumable and small: brass brushes and wood cleaning media that cannot scratch precision surfaces, mold cleaner compounds, parting spray and mold grease, ejector pin and bushing replacement stock, and quick-connect fittings for cooling lines so a leak can be found and fixed at the machine rather than in the repair area.
Two more items earn their place. A mold temperature gauge or calibrated probe lets you verify a channel is actually flowing rather than assuming it is, and a hot-runner maintenance kit with spare thermocouples, heater elements and nozzles covers the failures that stop a run on a multi-cavity tool. A well-maintained steel mold can run for decades; a neglected one can lose accuracy in a few thousand shots.
10. Industrial Material Handling Equipment
Material handling equipment is unglamorous and it prevents the injuries and damage that quietly cost a shop money. A forklift or pallet truck for resin bags, drums and finished goods, a hand truck or drum handler for the 25 kg bag, and a scissor lift table that sets a drum or heavy tote at a working height instead of at floor level.
Conveyors are the connective tissue. A powered belt or roller conveyor between the machine and the packaging station removes the lifting, and a gravity roller section lets you buffer a backlog without anyone standing there. Fit adjustable side guides so a light plastic part does not wander off the belt.
Storage decides how much time you lose looking for things. Pallet racking for resin and finished stock, shelving with labeled locations for gauges, EOAT, spare heater elements and quick-connect fittings, and dedicated bins for scrap and regrind so regrind never gets scooped from a mixed pile. Labeling is trivial to add and it is the difference between a five-minute changeover and a half-hour search.
A floor scale and a calibrated bin scale matter more than they sound, because regrind ratio, batch records and material cost tracking all depend on knowing how much material you actually consumed.
11. Safety, Environmental, and Compliance Equipment
Safety equipment is the one category where there is no phased roadmap. Every machine should be installed with fixed and interlocked guarding on the hazardous areas, a lockable emergency stop near the operator position, presence sensing where a guard must open for access, and energy isolation points that let an operator apply lockout and tagout before entering the mold area. The design basis for all of this is the machinery safety framework you should be able to name in your risk assessment: safety-related parts of control systems, machine electrical equipment, and risk assessment and risk reduction.
Practical additions: a rolling ladder that is actually used, a platform for working at height rather than a crate, a parts washer with a lid for cleaning hands and small items, an eyewash station near the resin handling area, and a first aid kit stocked for cuts and chemical contact.
Environmental and health controls cover fumes, dust and spills. Local fume extraction at the machine and at any hot runner purging point keeps degradation fumes out of the operator’s breathing zone. Dust collection handles pellet and regrind dust, and a vacuum system for housekeeping dust. Spill containment under resin, oil and additive storage areas, and an oil-water separator on the hydraulic service area, prevent a small leak from reaching the floor drain.
Noise needs measuring rather than guessing, especially with granulators, chiller fans and compressed air running together, and hearing protection has to be available where levels require it. Keep the compliance paperwork with the equipment: manuals, risk assessments, calibration certificates and test records are what an insurance renewal or a customer audit will ask for.
12. Preventive Maintenance and Plant-Floor Support Systems
Auxiliary equipment is bought once and run for a decade, and the shops that get ten good years out of it do the unglamorous things: centralized lubrication on moving parts, scheduled filter changes, and a maintenance system that remembers.
Start with consumables and calibration. Keep filters for the air treatment and the chiller in the parts room with the part numbers on the shelf, and put every instrument on a calibration schedule: thermometers, thermocouples, pressure gauges, calipers, micrometers, dew point meters, and the clamps on the key measuring tools. A drifting thermocouple will quietly move a whole process window.
Then add condition monitoring tools that pay for themselves: an infrared thermometer and a thermal camera for spotting hot bearings and clogged filters, a vibration pen on pumps and blowers, a clamp meter for motor current, and a sound level meter for the noise survey. Each of these turns an unplanned stop into a scheduled one.
A computerised maintenance management system (CMMS) is what holds it together. Asset list, scheduled task by calendar or runtime hours, spare part held against the task, labor hours, and a failure log. The failure log is the interesting part: after a year, the top five causes of auxiliary downtime in your shop are written down, and that list is far more useful than any generic priority order.
Support equipment rounds out the list: a maintenance cart with the tools, grease and meters that get used every week, a lifting device dedicated to machine work so it is never borrowed for something else, and a parts washer for reusable tooling hardware.
How to Choose Auxiliary Equipment for a Molding Shop
Choose by constraint, not by catalog. Six inputs decide almost everything: clamp tonnage, material, volume, labor availability, quality requirements and existing utilities.
Match capacity to the cell, not to the biggest machine you might buy
Sizing rules of thumb, each of which you should verify by measurement on a real part:
- Dryer capacity: size for hourly consumption plus a buffer, so a granulator stop does not starve the press. A useful check is that one dryer load covers a sensible fraction of a shift for that machine.
- Chiller capacity: derive from measured heat in the cooling water, not from clamp tonnage. Multiply the measured flow by the density, the specific heat and the temperature rise to get kW of heat to remove, and add headroom for a hot day and a fouled heat exchanger.
- TCU flow and zone count: flow has to keep the water moving in the channels fast enough to hold temperature, and zone count follows the mold. A dual-zone unit lets a hot runner mold run a hot core and a cool cavity at the same time.
- Vacuum conveying: size the pump for the simultaneous load of all receiving hoppers plus leakage, and design the pipe layout for the longest run, not the shortest.
- Robot payload: part weight plus runner weight plus gripper weight, with a margin, checked against the arm’s rating at the reach you need.
- Compressed air: sum the measured peak flows of ejectors, actuators, granulator and packaging, and size the compressor with a receiver that covers the peak.
Stagger the purchases when capital is limited
New shops ask this constantly, and the answer is a phase order rather than a shopping list.
- Phase one, the safety and quality floor: air treatment, a dryer sized for the first materials, a TCU for the first mold, cooling with filtration, a granulator for runners, basic inspection tools, guarding and lockout.
- Phase two, capacity and repeatability: a properly sized process chiller, gravimetric blending, vacuum conveying, a heat exchanger, and inspection equipment that supports customer requirements.
- Phase three, labor and data: robot take-out, end-of-line automation, in-mold sensing, data capture and condition monitoring.
Moving a phase two item forward is reasonable when a specific job demands it. Adding a robot before the chiller is sized is not, because the robot will simply cycle faster into the same bottleneck.
Audit the utilities before you sign for the equipment
Nobody covers this part and it decides whether the installation works on day one. Check electrical service capacity and phase balance for the new loads, especially for heaters and chillers; check the compressed air capacity and air quality contract; confirm floor loading for resin storage, chillers and a crane; check the chilled water plant and whether a tower or closed loop fits the site; confirm dust collection and HVAC, because a molding room with no extraction accumulates heat and odor quickly; and check ceiling height and aisle width for forklift and mold movement.
Evaluate on total cost, acceptance criteria and support
Total cost of ownership covers the purchase plus energy, consumables, maintenance labor, downtime risk and service life. Two items dominate energy on most floors: the dryer and the chiller. A variable speed drive on the chiller compressor and pumps, correct setpoints, and insulation on hot and cold lines are cheap changes with measurable payback, and so is not drying more resin than the process needs.
Write acceptance criteria into the purchase order before delivery. For a dryer: verified dew point at the outlet and material-temperature stability over a full cycle, verified with a portable dew point meter. For a chiller: kW of heat removal demonstrated at a stated coolant temperature, with noise measured at the operator position. For a robot: a demonstrated cycle time in the actual mold with a safety risk assessment and a valid safety-related control certificate for the cell. For conveying: a demonstrated fill on all hoppers with level detection and material shortage alarms functioning.
Also ask what the supplier does after the sale: spare part lead times, service response, a recommended preventive maintenance schedule, and whether the controls can be integrated with your data system. Vendor-neutral advice is what I would give any shop: the closest competitor pages in this space all rank their own brand first, and that tells you nothing about whether the equipment will still work in year five.
Used and refurbished equipment is a reasonable strategy for a starting shop and for non-critical auxiliaries, but apply judgment by category. Chillers, TCUs and compressors are worth buying used with service history, since their failure modes are well understood. Dryers need careful checks on desiccant life, seals and heating elements. Robots are harder to evaluate, because controller and servo age, spare part availability and integrator support matter more than the arm’s hours. Any used item should come with a functional test in front of you, an electrical and safety check, and a written list of what was not tested.
Buy in the order your defect log tells you
The fastest way to prioritize is your own data. Pull the last six months of scrap reasons and the last six months of downtime causes, and sort them by hours lost. The auxiliary responsible for the top line is your next purchase, whatever any checklist says. In practice that is very often a chiller, a dryer, or compressed air quality, and never the machine a buyer expected.
A short symptom guide helps make that audit faster. Silver streaks and bubbles on a clear or translucent part point at moisture, so check dew point, dryer time and hopper sealing. Dimensional drift within a run points at mold temperature stability, so check TCU control and cooling flow. Splay at the gate, and a sudden loss of mechanical properties in nylon, point at wet material and a dryer that has lost its desiccant. Flash that grows over a shift often points at fill or clamping rather than at an auxiliary, but declining mold temperature from a weak chiller shows up the same way. Streaky or shifting color points at the blender and the dosing accuracy, not at the resin. A mold that is hot on one side and cool on the other almost always has a partially blocked cooling channel, and cleaning equipment from section 9 is the fix.
Frequently Asked Questions
What is auxiliary equipment in an injection molding shop?
Auxiliary equipment, also called peripheral or secondary equipment, is everything around the press that conditions and moves material: resin dryers, automatic loaders and vacuum conveying, gravimetric blenders, mold temperature controllers, process chillers, granulators, robots and end-of-arm tooling, conveyors, inspection tools and safety systems. The injection molding machine itself only melts and forms plastic. Auxiliaries decide whether material arrives dry, mold temperature repeats, and parts and scrap move without stopping the cycle.
Which auxiliary equipment should a small molding shop buy first?
Start with the safety and quality floor: compressed air with proper filtration, a dehumidifying dryer sized for the resins you actually run, a mold temperature controller, cooling with filtration, a granulator for runners and rejects, basic inspection tools such as calipers and micrometers, guarding and lockout. Add a properly sized process chiller, gravimetric blending, vacuum conveying and robot take-out later, in that order, as volume and labor pressure justify them.
Are temperature controllers and chillers basic or advanced molding equipment?
They are basic, and they are where a shop should not cut corners. A mold temperature controller holds the mold at setpoint so dimensions repeat, and a process chiller removes the heat the mold cannot hold so cycle time closes. On a fast or high-cavity part the cooling stage is often the longest part of the cycle, so a weak chiller shows up directly as lost cycle time and drifting dimensions. Advanced territory is in-mold sensing, data capture and condition monitoring, which build on top of these two.
How much does auxiliary equipment improve injection molding productivity?
Most of the gain comes from removing stops and variation rather than from any headline speed. Stable mold temperature and adequate cooling shorten the cycle and hold dimensions, dry material cuts scrap from splay and hydrolysis, gravimetric dosing holds color and weight across long runs, and robotic take-out keeps the cell running during operator breaks. Measure it by sorting downtime and scrap causes over six months and attacking the top line first, which is more reliable than any general productivity figure.
Should a molding shop automate parts removal and palletizing?
Pick-and-place usually pays back on a stable, high-volume part where the robot cycle fits comfortably inside the mold open time, at roughly 60 percent of the press cycle as a target. End-of-line palletizing pays back when labor is genuinely scarce or parts are heavy and repetitive. For frequent changeover, low volume or a mix of prototypes, a good operator and a simple roller conveyor will often beat a robot that waits for the next job. Size the robot on part plus runner plus gripper weight at the reach you need.
How often should molding shop support equipment be maintained?
Treat the schedule by category. Check or change air and chiller filters on a fixed interval, more often in dusty or high-grind conditions; monitor dryer dew point and desiccant condition continuously with a monthly verification; service compressors, chillers and granulators on the manufacturer’s runtime schedule; and calibrate thermometers, thermocouples, pressure gauges, calipers and micrometers on a documented cycle. Keep a failure log, because after a year the top five causes of auxiliary downtime in your own shop are the most useful maintenance input you will have.
Conclusion
The auxiliary equipment every molding shop needs is the same short list at any scale: temperature control, clean compressed air, cooling, dry and accurately fed material, scrap recovery, part handling, inspection, material movement, safety and a maintenance plan. The only real difference between a one-press shop and a forty-press plant is whether those are bought one at a time or centralized with data on top.
So do not start with a catalog. Pull your last six months of downtime and scrap reasons, sort by hours lost, and buy against the top line. Fix the chiller or the dryer or the air quality first, and the press will start behaving in a way no new machine ever promised.